
카테고리 없음
[javascript] 이벤트, BOM, DOM
망고고래
2023. 11. 23. 17:41
javascript 활용 1: 여행 준비물 목록
<!DOCTYPE html>
<html lang="en">
<head>
    <meta charset="UTF-8">
    <meta name="viewport" content="width=device-width, initial-scale=1.0">
    <title>Document</title>
</head>
<body>
    <div id="wrapper">
        <h2>여행 준비물 점검 목록</h2>
        <form action="">
            <input type="text" id="item" autofocus = "true">
            <button type="button" id="add" class="addBtn">추가</button>
        </form>
        <div id="itemList"></div>
    </div>
    <script src="list.js"></script>
</body>
</html>
var itemList = [];
var addBtn = document.querySelector('#add');
addBtn.addEventListener("click",addList);
function addList(){
var item = document.querySelector("#item").value;
//var itm = document.getElementById(item).value;와 같음
if(item != null){ //입력받은 변수의 값이 있는지 없는지 검사: 유효성 검사
itemList.push(item); //배열에 변수의 값을 추가함
document.querySelector("#item").value = ""; //input 박스의 값을 공백으로 바꿈(초기화)
document.querySelector("#item").focus(); //입력>초기화 후에 자동으로 포커스되게 함
}
showlist();
}
//보여줌
function showlist(){
//추가할 태그 작성
var list = "<ul>";
for(var i = 0; i<itemList.length; i++)
{
list = list + "<li>"
+ itemList[i]
+ "<span class ='close' id = "
+ i
+ "> x </span></li>";
}
list = list + "</ul>"; //ul 닫음
//태그 배치
document.querySelector("#itemList").innerHTML = list;
//중복 선택>배열변수
var remove = document.querySelectorAll(".close");
for(var i = 0; i<remove.length; i++)
{
remove[i].addEventListener("click",removelist);
}
}
//삭제
function removelist(){
//this = 선택된(이벤트를 발생시킨) <span> 태그
var id = this.getAttribute("id");
itemList.splice(id,1); //id번째에서 하나 삭제
showlist(); //삭제 후 재출력
}

javascript 활용 2: 민들레 설명
onclick과 EventListener(click, 함수) 활용
<!DOCTYPE html>
<html lang="en">
<head>
    <meta charset="UTF-8">
    <meta name="viewport" content="width=device-width, initial-scale=1.0">
    <title>Document</title>

    <link rel="stylesheet" href="hidden.css">
</head>
<body>
    <div class="container">
        <div id="item">
            <img src="../포트폴리오/img/초롱아귀.png" alt="">
            <button class="over" id="open">상세설명 보기</button> <!--시작 태그 안에 onclick = "showdetail()"도 됨-->
            <div id="desc" class="detail">
                <h4>민들레</h4>
                <p>어디서나 매우 흔하게 보이는 잡초로서 바닥에 딱 붙어서 꽃봉오리 하나가 쑥 올라온다. 톱니 모양의 잎새와 눈에 확 띄는 노란 꽃이 인상적이다. 특히 꽃이 지고나면 솜털모양의 깃을 가진 씨앗들이 나오는데 바람을 타고 날아가서 널리 퍼진다.</p>
                <button id="close">상세설명 닫기</button>
            </div>
        </div>
    </div>
    <script>
        var a = document.querySelector('#close');
        a.onclick = function(){
        hidedetail();
        }

    </script>
    <script src="hidden.js"></script>
</body>
</html>
function showdetail(){
    document.querySelector("#desc").style.display="block";
    document.querySelector("#open").style.display="none";
}
function hidedetail(){
    document.querySelector("#desc").style.display="none";
    document.querySelector("#open").style.display="block";
}
// var b = document.querySelector('#open');
// b.addEventListener("click",showdetail);
document.querySelector('#open').addEventListener('click',showdetail);
1.7 이벤트
| 객체 프로퍼티 | 설명 및 특징 |
| target | 이벤트를 발생시킨 객체 반환 |
| type | 이벤트의 이름 반환 |
| clientX | 이벤트가 발생한 X좌표값 반환(브라우저 기준) |
| clientY | 이벤트가 발생한 Y좌표값 반환(브라우저 기준) |
| screenX | 이벤트가 발생한 X좌표값 반환(모니터 기준) |
| screenY | 이벤트가 발생한 Y좌표값 반환(모니터 기준) |
| button | 마우스 왼쪽(0), 가운데(1), 오른쪽(2) 버튼 값 반환 |
<!DOCTYPE html>
<html lang="en">
<head>
<meta charset="UTF-8">
<meta name="viewport" content="width=device-width, initial-scale=1.0">
<title>Document</title>
<script>
window.onload = function(){
var bt = document.getElementById('bt');
var area = document.getElementById('area');
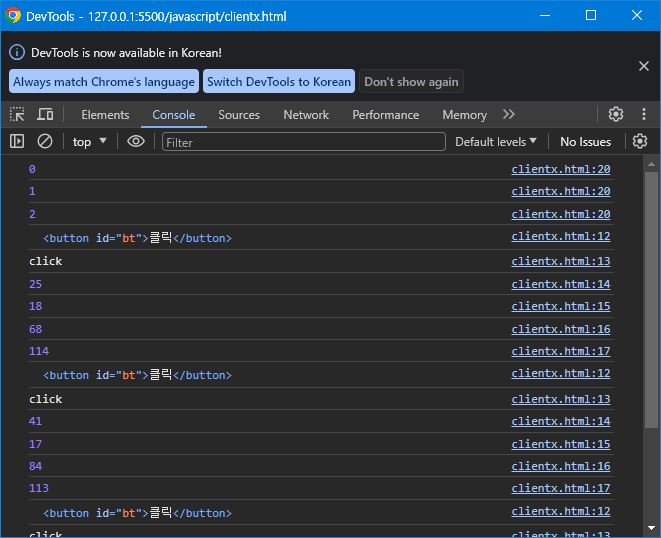
bt.onclick = function(event){
console.log(event.target);
console.log(event.type);
console.log(event.clientX);
console.log(event.clientY);
console.log(event.screenX);
console.log(event.screenY);
}
area.onmousedown = function(event){
console.log(event.button);
}
}
</script>
</head>
<body>
<button id="bt">클릭</button>
<div id="area">여기에 마우스 왼쪽, 가운데, 오른쪽 버튼 클릭</div>
</body>
</html>
| preventDefault() | 기본 이벤트의 실행을 막음(a태그의 페이지 이동 등) |
| stopPropagation | 이벤트 버블링(자식 이벤트로 인해 부모 이벤트까지 실행) 방지 |
<!DOCTYPE html>
<html lang="en">
<head>
    <meta charset="UTF-8">
    <meta name="viewport" content="width=device-width, initial-scale=1.0">
    <title>Document</title>
    <script src="preventDefault.js"></script>
</head>
<body>
    <div>
        <a href="http://itedunet.com" id="linker">아이티에듀넷</a>
    </div>
</body>
</html>
window.onload = function(){
    var a = document.getElementById('linker');
    a.onclick = function(){
        alert('아이티에듀넷');
        event.preventDefault();
    }

}
1.8 BDM(Browser object Model)
| 윈도우 객체 | 설명 및 특징 |
| open() | 새로운 윈도우를 만들어주는 메서드 |
| 예) | window.open('문서 주소', '윈도우 이름', '옵션=값,옵션=값'; |
html1: 팝업
<!DOCTYPE html>
<html lang="en">
<head>
    <meta charset="UTF-8">
    <meta name="viewport" content="width=device-width, initial-scale=1.0">
    <title>Document</title>
</head>
<body>
    <img src="../포트폴리오/img/suisou_side.png" alt="">
</body>
</html>
html2: 메인(실행하면 팝업창이 나옴)
<!DOCTYPE html>
<html lang="en">
<head>
    <meta charset="UTF-8">
    <meta name="viewport" content="width=device-width, initial-scale=1.0">
    <title>Document</title>
</head>
<body>
    <script>
        window.open('http://naver.com', 'suisou', 'width=450, height=350, left=100, top=10');
    </script>
</body>
</html>
| 타이머 함수 | 설명 및 특징 |
| setInterval() | 일정 시간마다 지정한 함수를 반복적으로 실행하는 함수 |
| setInterval(function(){실행문}, 밀리초); | |
| clearInterval() | setInterval() 함수 중지 |
| setTimeout() | 설정한 시간이 흐른 뒤에 지정한 함수 한 번 실행 |
| setTimeout(function(){실행문}, 밀리초); | |
| clearTimeout() | setTimeout() 함수 중지 |
<!DOCTYPE html>
<html lang="en">
<head>
    <meta charset="UTF-8">
    <meta name="viewport" content="width=device-width, initial-scale=1.0">
    <title>Document</title>
    <script>
        window.onload = function(){
            var bt = document.getElementById('bt');
            var i = 0;
            var increase = setInterval(function(){i++; alert(i);}, 3000);
            bt.onclick = function(){
                clearInterval(increase);
            };
        };
    </script>
</head>
<body>
    <button id="bt">멈춤</button>
</body>
</html>
| location 객체 | 설명 및 특징 |
| location | 웹브라우저의 주소 URL 관련 객체 |
| 프로퍼티 | http://itedunet.com:8080/search?book=5#coding |
| location 객체 프로퍼티 | 설명 및 특징 | |
| hash | #coding | 주소의 앵커명(#) 반환 |
| host | http://itedunet.com:8080 | 호스트명과 포트 번호 반환 |
| port | 8080 | 포트 번호 반환 |
| pathname | /search | 패스명 반환 |
| href | 전체주소 | 주소 값 반환 |
| protocol | http: | 프로토콜명 반환 |
| search | ?book=5 | 쿼리 문자열 반환 |
| location 객체 메서드 | 설명 및 특징 |
| reload() | 현재 페이지 다시 로드 |
| <button onclick="javascript:location.reload();">reload</button> | |
| replace() | replace(url)에서 url 값으로 이동 |
| <button onclick="javascript:location.replace('http://itedunet.com');replace</button> |
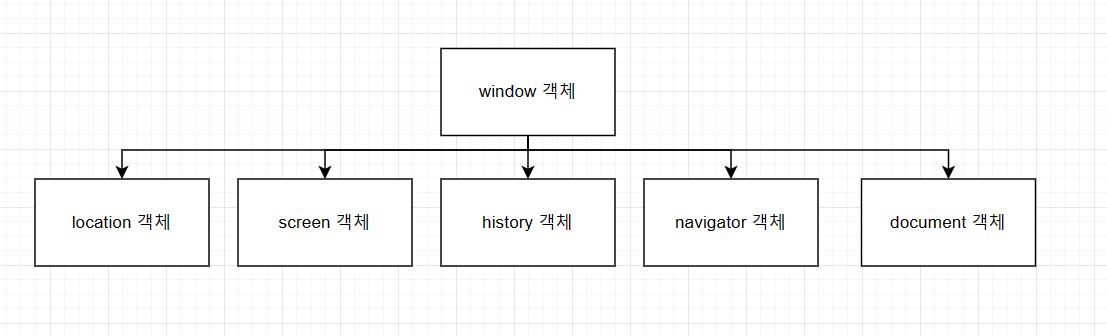
screen 객체: 모니터 화면정보 관련 객체
history 객체: 페이지가 이동한 정보 관리 객체
navigator 객체: 브라우저 버전, 브라우저명 등 브라우저 정보 객체
1.9 DOM(Document object Model)
| 요소 선택 메서드 | 설명 및 특징 |
| getElementById() | id 속성으로 선택 |
| getElementByClassName() | class 속성으로 선택 |
| getElementByTagName() | 태그 이름으로 선택 |
| getElementByName() | name 속성으로 선택 |
| querySelector() | CSS와 같은 방법으로 선택 |
| querySelectorAll() | 위의 선택방법은 첫 번째만 선택 All()은 모든 요소 선택 |
<!DOCTYPE html>
<html lang="en">
<head>
<meta charset="UTF-8">
<meta name="viewport" content="width=device-width, initial-scale=1.0">
<title>Document</title>
<script>
window.onload = function(){
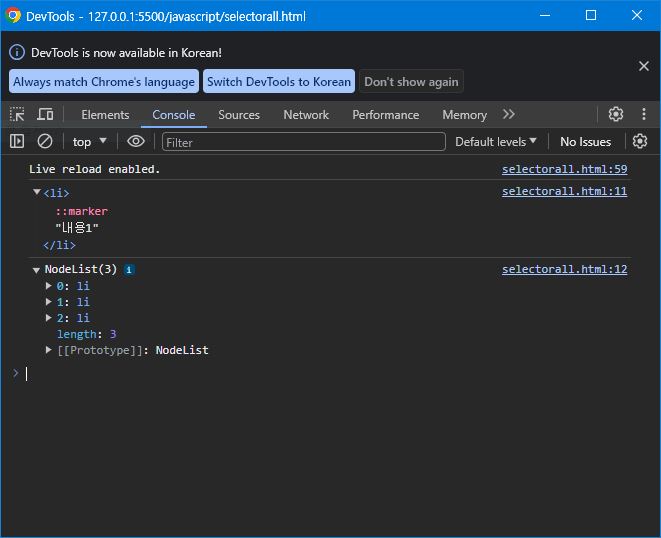
var list1 = document.querySelector('#box1>ul>li');
var list2 = document.querySelectorAll('#box2>ul>li');
console.log(list1);
console.log(list2);
}
</script>
</head>
<body>
<div id="box1">
<ul>
<li>내용1</li>
<li>내용2</li>
<li>내용3</li>
</ul>
</div>
<div id="box2">
<ul>
<li>내용4</li>
<li>내용5</li>
<li>내용6</li>
</ul>
</div>
</body>
</html>
노드 선택
css와 달리 부모 노드와 이전 형제 노드를 선택할 수 있다.
| parentNode | 부모 노드 선택 |
| previousSibling | 이전 형제 노드 선택 |
parentNode: 부모 노드 선택
childNodes: 자식 노드들(요소 노드, 텍스트 노드) 선택
children: 자식 노드들(요소 노드) 선택
nextSibling: 다음 형제 노드 선택
previousSibling: 이전 형제 노드 선택
firstChild: 첫 번째 자식 노드 선택
lastChild: 마지막 자식 노드 선택
tagName: 요소의 태그명 반환
nodevalue: 노드의 value값 반환
nodeType: 노드의 타입 반환(1: 요소, 2: 속성, 3: 텍스트)
id: 노드의 id값 반환
className: 요소의 class값 반환
| 요소 생성 | 설명 및 특징 |
| createElement() | 요소 생성 메서드 |
| createTextNode() | 텍스트를 생성하는 메서드 |
| appendChild() | 요소를 부모와 자식 관계로 만듦 |
<!DOCTYPE html>
<html lang="en">
<head>
<meta charset="UTF-8">
<meta name="viewport" content="width=device-width, initial-scale=1.0">
<title>Document</title>
<style>
div{
position: fixed;
left: 100px;
top: 10px;
width: 200px;
height: 200px;
background: #718c00;
}
</style>
<script>
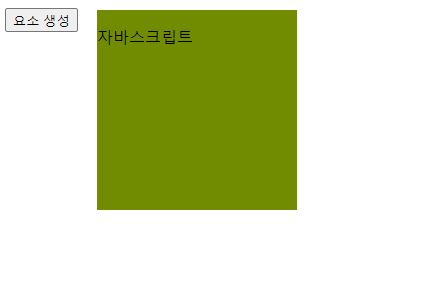
function createEle(){
var bt = document.getElementById('bt');
function popup(){
var div = document.createElement('div');
var p = document.createElement('p');
var txt = document.createTextNode('자바스크립트');
p.appendChild(txt);
div.appendChild(p);
document.body.appendChild(div);
}
bt.onclick = popup;
}
addEventListener('load',createEle);
</script>
</head>
<body>
<button id="bt">요소 생성</button>
</body>
</html>
※addEventListner('load', createEle);는 아래의 코드와 기능이 같다.
window.onload = function{
    createEle();
    }