4. MySQL 기본 명령어
4.1 테이블 관련 명령어
4.2 데이터 조작 명령어
4.2 데이터 조작 명령어
CRUD: Create Read Update Delete
데이터 조작 명령어의 종류
INSERT: 데이터 등록
SELECT: 데이터 조회
UPDATE: 데이터 수정
DELETE: 데이터 삭제
1)데이터 등록: INSERT
INSERT [INTO] 테이블명 [(필드 이름, 필드 이름, ...)] VALUES (필드 값, 필드 값, ...)
INSERT INTO sheet2 VALUES ("aaa","1234",30,"frog");
insert into sheet2 values ("bbb","2222",40,"snail");
insert into sheet2 values ("ccc","3333",50,"racoon");
insert into sheet2 values ("eee","4444",60,"lemon");
insert into sheet2 values ("fff","5555",70,"blueberry");
2)데이터 조회: SELECT
SELECT 필드명[, 필드명, ...] FROM 테이블명 [WHERE 검색조건] [ORDER BY 필드명 [ASC OR DESC]]
[GROUP BY 필드명[, 필드명, ...]]
select * from sheet2; -- 모든 컬럼 조회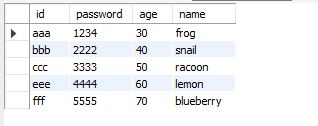
select id from sheet2; -- 컬럼 지정해서 조회select * from sheet2 where age >30; -- WHERE절로 조건 지정해서 조회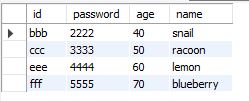
select * from sheet2 limit 3; -- 위에서 3행까지만 출력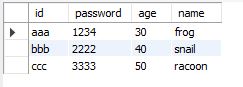
3)UPDATE: 데이터 수정
update sheet2 set id = 'abcd' where id = 'aaa';
-- id가 aaa인 행의 id를 abcd로 수정
4)DELETE: 데이터 삭제
delete from sheet2 where id = 'abcd';
-- 값이 유일한 항목으로 where절을 지정해서 삭제 권장
-- id가 abcd인 행 삭제
16장. JDBC: 데이터베이스-JSP 연동
1. 개요
2. JDBC 드라이버 로딩 및 DBMS 접속
3. 데이터베이스 쿼리 실행
4. 쿼리문 실행 결과값 가져오기
1. 개요
JDBC(Java DataBase Connectivity)
자바/JSP 프로그램 내에서 데이터베이스 작업을 처리할 수 있도록 도와주는 자바 표준 인터페이스
관계형 데이터베이스 시스템에 접근해서 SQL문을 실행하기 위한 자바 API/자바 라이브러리
드라이버를 설치하면 DBMS의 종류에 상관없이 데이터베이스 작업 가능
JDBC를 사용한 JSP와 데이터베이스의 연동 순서
1. DB 연결
- java.sql.* 패키지 임포트
- JDBC 드라이버 로딩
- 데이터베이스 접속을 위한 Connection 객체 생성
2. Data 확보
- 쿼리문을 실행하기 위한 Statement/PreparedStatement/CallableStatement 객체 생성
- 쿼리 실행
3. Data 활용
- 쿼리 실행 결과값(int, ResultSet) 사용
- 사용된 객체 역순으로 종료
2. JDBC 드라이버 로딩 및 DBMS 접속
2.1 JDBC 드라이버 로딩
2.2 Connection 객체 생성
2.3 데이터베이스 연결 닫기
2.1 JDBC 드라이버 로딩
Class.forName(String className);
MySQL 드라이버 로딩 예시
<%
    try{
        Class.forName("com.mysql.jdbc.Driver");
    }catch(SQLException ex){

    }
%>
다른 방법: web.xml 파일의 <init-param>에 드라이버 이름 설정
<init-param>
	<param-name>jdbcDriver</param-name>
    <param-value>com.mysql.jdbc.Driver</param-value>
</init-param>
2.2 Connection 객체 생성
static Connection getConnection(String url)
static Connection getConnection(String url, String user, String password) //권장
static Connection getConnection(String url, Properties info)
1)getConnection(String url) 사용
Connection conn = null;
try{
    Class.forName("com.mysql.jdbc.Driver");
    conn = DriverManager.getConnection("jdbc:mysql;//localhost:3306/JSPBookDB?user=root&password=1234");
}catch(SQLException ex){
    //예외 발생 처리
    }
2)getConnection(String url, String user, String password) 사용
Connection conn = null;
try{
    Class.forName("com.mysql.jdbc.Driver");
    conn = DriverManager.getConnection("jdbc:mysql;//localhost:3306/JSPBookDB", "root","1234");
}catch(SQLException ex){
    //예외 발생 처리
    }
3)getConnection(String url, Properties info) 사용
Connection conn = null;
try{
    Class.forName("com.mysql.jdbc.Driver");
    Properties props = new Properties();
    props.put("user", "root");
    props.put("password", "1234");
    conn = DriverManager.getConnection("jdbc:mysql;//localhost:3306/JSPBookDB", props);
}catch(SQLException ex){
    //예외 발생 처리
    }
2.3 데이터베이스 연결 닫기
데이터베이스 연결이 더 이상 필요없으면 close() 메서드로 생성한 Connection 객체를 해제해야 한다.
void close() throws SQLException
예시
Connection conn = null;
try{
    //JDBC 드라이버 로딩
    //Connection 객체 생성
} catch(SQLExceptioin e){
    //예외 발생 처리
} finally{
    if(conn != null)
        conn.close();
}
예제
Connection conn = null;

try{
    String url = "jdbc:mysql://localhost:3306/JSPBookDB_test";
    String user = "root";
    String password = "1234";

    Class.forName("com.mysql.jdbc.Driver");
    conn = DriverManager.getConnection(url, user, password);
    out.println("데이터베이스 연결에 성공했습니다.");
} catch(SQLException ex){
    out.println("데이터베이스 연결에 실패했습니다.<br>");
    out.println("SQLException: "+ex.getMessage());
} finally{
    if(conn != null)
        conn.close();
}
3. 데이터베이스 쿼리 실행
쿼리 실행 객체
- Statement
- PreparedStatement
- CallableStatement
3.1 Statement 객체로 데이터 접근
3.2 PreparedStatement 객체로 데이터 접근
3.1 Statement 객체로 데이터 접근
- 정적인 쿼리에 사용
- 하나의 쿼리를 사용하고 나면 재사용 불가→close()로 해제해야 함
- 간단한 쿼리문을 사용하는 경우 좋음
Statement createStatement() throws SQLException
Statement 객체의 메서드
| 메서드 | 반환 유형 | 설명 |
| executeQuery(String sql) | ResultSet | SELECT문 실행시 사용 |
| executeUpdate(String sql) | int | 삽입, 수정, 삭제 관련 SQL문 실행에 사용(affected 행수 반환) |
| close() | void | Statement 객체 반환시 사용 |
ResultSet: 데이터 묶음(Enumeration과 유사)
1)executeQuery() 예시(SELECT 쿼리문)
Connection conn = null;
//생략
Statement stmt = conn.createStatement();
String sql = "SELECT * FROM Member WHERE id = '1'";
ResultSet rs = stmt.executeQuery(sql);
stmt.close();
2)executeUpdate() 예시(INSERT, UPDATE, DELETE)
Connection conn = null;
//생략
Statement stmt = conn.createStatement();
String sql = "INSERT INTO Member(id, name, passwd) VALUES ('1', '홍길순', '1234')";
int rs = stmt.executeUpdate(sql);
예제
①sql에서 데이터베이스, 테이블 생성
create table if not exists member(
	id varchar(20) not null,
    passwd varchar(20),
    name varchar(30),
    primary key(id)
);

select * from member;
②form 생성
<form method="post" action="insert01_process.jsp">
    <p>아이디: <input type="text" name="id">
    <p>비밀번호: <input type="password" name="passwd">
    <p>이름: <input type="text" name="name">
    <p><input type="submit" value="전송">
</form>
③DB 연결
<%@ page import = "java.sql.*" %>
<%
	Connection conn = null;

	String url = "jdbc:mysql://localhost:3306/JSPBookDB";
	String user = "root";
	String password = "1234";

	Class.forName("com.mysql.jdbc.Driver");
	conn = DriverManager.getConnection(url, user, password);
%>
④process
request.setCharacterEncoding("utf-8");


String id = request.getParameter("id");
String passwd = request.getParameter("passwd");
String name = request.getParameter("name");

Statement stmt = null;

try{
    String sql = "INSERT INTO Member(id, passwd, name) VALUES('"+id+"','"+passwd+"','"+name+"')";
    stmt = conn.createStatement();
    stmt.executeUpdate(sql); //실행
    out.println("Member 테이블 삽입에 성공했습니다.");
}catch(SQLException ex){
    out.println("Member 테이블 삽입에 실패했습니다.<br>");
    out.println("SQLException: "+ex.getMessage());
}finally{
    if(stmt != null)
        stmt.close();
    if(conn != null)
        conn.close();
}
3.2 PreparedStatement 객체로 데이터 접근
동적인 쿼리에 사용
하나의 객체로 쿼리 여러 번 실행 가능
PreparedStatement prepareStatement(String sql) throws SQLException
sql: 데이터베이스에 보낼 쿼리문. 정해지지 않은 값을 물음표로 표시
setXxx(): 값 할당시 사용하는 메서드
| setXxx 메서드 | 반환 유형 | 설명 |
| setString(int parameterIndex, String x) | void | 문자열 |
| setInt(int parameterIndex, int x) | void | 정수형 |
| setLong(int parameterIndex, long x) | void | 정수형 |
| setDouble(int parameterIndex, double x) | void | 실수형 |
| setFloat(int parameterIndex, float x) | void | 실수형 |
| setObject(int parameterIndex, Object x) | void | 객체형 |
| setDate(int parameterIndex, Date x) | void | 날짜형 |
| setTimestamp(int parameterIndex, Timestamp x) | void | 시간형 |
request.setCharacterEncoding("utf-8");

String id = request.getParameter("id");
String passwd = request.getParameter("passwd");
String name = request.getParameter("name");

PreparedStatement pstmt = null;

try{
    String sql = "insert into member(id, passwd, name) values(?,?,?)";
    pstmt = conn.prepareStatement(sql);
    pstmt.setString(1,id);
    pstmt.setString(2,id);
    pstmt.setString(3,name);
    pstmt.executeUpdate();
    out.println("Member 테이블 삽입에 성공했습니다.");
}catch(SQLException ex){
    out.println("Member 테이블 삽입에 실패했습니다.<br>");
    out.println("SQLException: "+ex.getMessage());
}finally{
    if(pstmt != null)
        pstmt.close();
    if(conn != null)
        conn.close();
}
'정리노트' 카테고리의 다른 글
| [JSP] JSTL (0) | 2023.12.22 |
|---|---|
| [JSP] JDBC (0) | 2023.12.21 |
| [JSP]쿠키, 데이터베이스 (0) | 2023.12.19 |
| [JSP] 세션 (0) | 2023.12.18 |
| [JSP] (0) | 2023.12.15 |