BookDTO 클래스 작성
public class BookDTO {
	private String title;
	private int price;
	private String company;
	private int page;
	public BookDTO() {}
	public BookDTO(String title, int price, String company, int page) {
		super();
		this.title = title;
		this.price = price;
		this.company = company;
		this.page = page;
	}
	public String getTitle() {
		return title;
	}
	public void setTitle(String title) {
		this.title = title;
	}
	public int getPrice() {
		return price;
	}
	public void setPrice(int price) {
		this.price = price;
	}
	public String getCompany() {
		return company;
	}
	public void setCompany(String company) {
		this.company = company;
	}
	public int getPage() {
		return page;
	}
	public void setPage(int page) {
		this.page = page;
	}
	@Override
	public String toString() {
		return "BookDTO[title="+title+ ", price=" + price + ", company=" + company + ", page=" + page + "]";
	}

}
import java.util.ArrayList;
import java.util.List;

import com.google.gson.Gson;
import com.google.gson.reflect.TypeToken;

public class Proejct01 {

	public static void main(String[] args) {
		// TODO Auto-generated method stub

		//1. 자바 객체 json(String)으로 변경
		//@RestController에서는 자바 객체도 자동으로 json으로 리턴
		BookDTO dto = new BookDTO("자바", 21000, "에이콘", 670);
		Gson g = new Gson();
		String json = g.toJson(dto);
		System.out.println(json);
		//{"title":"자바","price":21000,"company":"에이콘","page":670}

		//2. json을 자바 객체로 변경
		BookDTO dto1 = g.fromJson(json, BookDTO.class);
		System.out.println(dto1); //BookDTO[title=자바, price=21000, company=에이콘, page=670]
		//toString() 메서드 때문에 바로 String으로 출력됨
		System.out.println(dto1.toString()); //BookDTO[title=자바, price=21000, company=에이콘, page=670]
		System.out.println(dto1.getTitle()+"\t"+dto1.getPrice()); //자바	21000

		//3.배열을 json으로 변경
		List<BookDTO> lst = new ArrayList<BookDTO>();
		lst.add(new BookDTO("자바1", 21000, "에이콘1", 570));
		lst.add(new BookDTO("자바2", 31000, "에이콘2", 670));
		lst.add(new BookDTO("자바3", 11000, "에이콘3", 370));

		String lstJson = g.toJson(lst);
		System.out.println(lstJson);
		//[{"title":"자바1","price":21000,"company":"에이콘1","page":570},{"title":"자바2","price":31000,"company":"에이콘2","page":670},{"title":"자바3","price":11000,"company":"에이콘3","page":370}]

		//4. Json을 자바 배열로 변경
		List<BookDTO> lst1 = g.fromJson(lstJson, new TypeToken<List<BookDTO>>() {}.getType());
		for(BookDTO vo : lst1) {
			System.out.println(vo);
		}
		/*BookDTO[title=자바1, price=21000, company=에이콘1, page=570]
		BookDTO[title=자바2, price=31000, company=에이콘2, page=670]
		BookDTO[title=자바3, price=11000, company=에이콘3, page=370]*/

	}

}
Java에서 JSON 작성하기
import org.json.*;

public class Project02 {

	public static void main(String[] args) {
		//1. JSON 객체 생성
		JSONObject student = new JSONObject();
		student.put("name", "홍길동");
		student.put("phone", "010-1111-1111");
		student.put("address", "서울");
		System.out.println(student);

		JSONObject student2 = new JSONObject();
		student2.put("name", "나길동");
		student2.put("phone", "010-2222-2222");
		student2.put("address", "광주");


		//2. 배열 생성 및 객체 추가
		JSONArray students = new JSONArray();
		students.put(student);
		students.put(student2);
		System.out.println(students);
		//[{"address":"서울","phone":"010-1111-1111","name":"홍길동"},{"address":"광주","phone":"010-2222-2222","name":"나길동"}]


		//3. 배열을 JSONObject에 넣기
		JSONObject object = new JSONObject();
		object.put("students", students);
		System.out.println("object: "+object);
		//object: {"students":[{"address":"서울","phone":"010-1111-1111","name":"홍길동"},{"address":"광주","phone":"010-2222-2222","name":"나길동"}]}

	}

}
object의 출력 결과를 파일로 만들어 info.json으로 프로젝트 src 폴더에 저장한다.
import java.io.InputStream;

import org.json.*;

public class Project03 {

	public static void main(String[] args) {
		String src="info.json";

		//Project03 클래스의 getResourceAsStream 메서드로
        //src 변수에 지정된 파일의 InputStream을 가져옴
		InputStream is=Project03.class.getResourceAsStream(src);
		//파일을 찾을 수 없는 경우 처리
		if(is==null) {
			throw new NullPointerException("Cannot find resource file");
		}
		//InputStream으로 받은 문자열을 JSON 형태로 메모리에 로딩
        //JSONTokener는 문자열을 읽고 JSON 데이터의 요소(키, 값, 배열, 객체 등)으로 분해
		JSONTokener tokener=new JSONTokener(is);
		//JSON에서 JSONObject 형태로 변환
        //key:value 형태로 사용 가능
		JSONObject object=new JSONObject(tokener);
		//JSON 객체에서 "students" 키에 해당하는 JSONArray를 가져옴
		JSONArray students=object.getJSONArray("students");
		for(int i=0; i<students.length(); i++) {
			JSONObject student=(JSONObject)students.get(i);
			System.out.println(student.get("name")+"\t");
			System.out.println(student.get("address")+"\t");
			System.out.println(student.get("phone"));
		}

	}

}
네이버 지도 API 이용
import java.io.BufferedReader;
import java.io.File;
import java.io.FileOutputStream;
import java.io.IOException;
import java.io.InputStream;
import java.io.InputStreamReader;
import java.io.OutputStream;
import java.io.UnsupportedEncodingException;
import java.net.*;
import java.util.Date;
import org.json.*;
public class Project04 {
public static void map_service (String point_x, String point_y, String address) {
String URL_STATICMAP = "https://naveropenapi.apigw.ntruss.com/map-static/v2/raster?";
try {
String pos = URLEncoder.encode(point_x + " " + point_y, "UTF-8");
String url = URL_STATICMAP;
url += "center=" + point_x + "," + point_y;
url += "&level=16&w=700&h=500";
url += "&markers=type:t|size:mid|pos:"+pos+"|label:"+URLEncoder.encode(address, "UTF-8");
//url 생성(위도/경도 변수 처리)
URL u = new URL(url);
HttpURLConnection con = (HttpURLConnection)u.openConnection();
con.setRequestMethod("GET");
con.setRequestProperty("X-NCP-APIGW-API-KEY-ID", "client ID");
con.setRequestProperty("X-NCP-APIGW-API-KEY", "client secret");
int responseCode = con.getResponseCode();
BufferedReader br;
if(responseCode == 200) {//정상 호출
//이미지 저장
InputStream is = con.getInputStream();
int read = 0;
//이미지는 바이트 단위->바이트 배열
byte[] bytes = new byte[1024];
//파일명 랜덤 생성
String tempname = Long.valueOf(new Date().getTime()).toString();
File f = new File(tempname + ".jpg");
f.createNewFile();
OutputStream outputStream = new FileOutputStream(f);
//파일 저장
//바이트 단위로 읽음
while((read = is.read(bytes)) != -1) {
outputStream.write(bytes, 0, read);
}//while문
is.close();
}else {//에러 발생
br = new BufferedReader(new InputStreamReader(con.getErrorStream()));
String inputLine;
StringBuffer response = new StringBuffer();
while((inputLine = br.readLine()) != null) {
response.append(inputLine);
}//while문
br.close();
System.out.println(response.toString());
}
} catch (Exception e) {
System.out.println(e);
}
}//map_service()
public static void main(String[] args) {
String x = "";
String y = "";
String z = "";
//키보드로 InputStreamReader 클래스를 통해 바이트 단위로 입력받고 라인단위로 읽기 위해 버퍼리더 연결
BufferedReader io = new BufferedReader(new InputStreamReader(System.in));
try {
System.out.print("주소를 입력하세요: ");
String address=io.readLine();
//입력받는 문자열에 공백이 있으면 데이터를 끝으로 인식, UTF-8로 변경하면 %20으로 변환됨
String addr=URLEncoder.encode(address, "UTF-8");
String reqUrl = "https://naveropenapi.apigw.ntruss.com/map-geocode/v2/geocode?query="+addr;
//URL을 URL 클래스에 담아서 openConnection()을 통해 네이버 서버와 연결
URL url = new URL(reqUrl);
HttpURLConnection con = (HttpURLConnection)url.openConnection();
con.setRequestMethod("GET");
//필요한 아이디와 비밀번호를 헤더에 파라미터로 삽입
con.setRequestProperty("X-NCP-APIGW-API-KEY-ID", client_id);
con.setRequestProperty("X-NCP-APIGW-API-KEY", client_secret);
BufferedReader br;
int responseCode=con.getResponseCode();
//정상적인 응답코드인 200이면 코드 실행
if(responseCode == 200) {
//한글이 깨지지 않도록 UTF-8 형식으로 문자 단위로 읽어서 라인 단위로 변환
br = new BufferedReader(new InputStreamReader(con.getInputStream(), "UTF-8"));
}else {
br = new BufferedReader(new InputStreamReader(con.getErrorStream()));
}
//임시저장소
String line;
StringBuffer response = new StringBuffer(); //JSON
//한 줄씩 읽어서 응답 클래스 안에 한 줄씩 입력
while((line = br.readLine()) != null) {
response.append(line);
}
br.close();
/* 1. 토큰: JSON을 문자열로 생성
* 2. JSON 오브젝트
* 3. JSON 배열
* 4. 배열 안의 데이터 사용*/
// "englishAddress" 키의 값을 출력
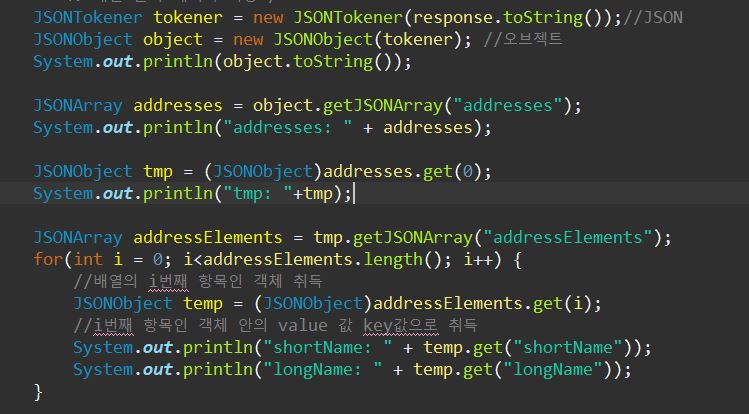
JSONTokener tokener = new JSONTokener(response.toString());// json을 문자열로 생성
JSONObject object = new JSONObject(tokener);// at 957 [character 958 line 1]
JSONArray arr = object.getJSONArray("addresses");
(int i = 0; i<arr.length(); i++) {
//배열의 i번째 항목인 객체 취득
JSONObject temp = (JSONObject)arr.get(i);
//i번째 항목인 객체 안의 value 값 key값으로 취득
System.out.println("address: " + temp.get("roadAddress"));
System.out.println("jibunAddress: " + temp.get("jibunAddress"));
System.out.println("경도: " + temp.get("x"));
System.out.println("위도: " + temp.get("y"));
x = (String) temp.get("x");
y = (String) temp.get("y");
z = (String) temp.get("roadAddress");
map_service(x, y, z);
} catch (IOException e) {
// TODO Auto-generated catch block
e.printStackTrace();
}
}
}
JSON에서 원하는 정보 취득하기
JSON 구조

'정리노트' 카테고리의 다른 글
| [스프링] 웹 플로우, 타일즈 (0) | 2024.02.01 |
|---|---|
| [스프링]스프링 웹 플로우 (0) | 2024.01.31 |
| [스프링]유효성 검사③ (0) | 2024.01.30 |
| [스프링] 유효성 검사② (0) | 2024.01.26 |
| [스프링]로그②, 다국어 처리 (0) | 2024.01.25 |