9. 다국어 처리
1. 개요
2. Locale 클래스 이용
3. JSTL fmt 클래스 이용
3. JSTL fmt 클래스 이용
①jstl-1.2.jar web-INF 안의 lib 폴더에 넣기
②<taglib> 명시
<%@ taglib prefix="fmt" uri="http://java.sun.com/jsp/jstl/fmt" %>③파일 명시
④파일 안에 key 명시→value 취득
1.로케일 설정 태그
2. 메시지 처리 태그
3. 숫자 태그
4. 날짜 태그
5. 시간 태그
1. 로케일 설정 태그
1)setLocale 태그
<fmt:setLocale
value="언어코드[_국가코드]"
[scope="(page|request|session|application)"]/>

<fmt:setLocale value="ko_KR"/>
2)requestEncoding 태그
<fmt:requestEncoding value="euc-kr|utf-8"/>
2. 메시지 처리 태그의 기능과 사용법
1)리소스번들
2)bundle 태그
3)message 태그
1)리소스번들(=메시지번들)
java 파일이 있는 폴더 안에 property를 생성하면 컴파일러가 WEB-INF/classes 폴더에 넣는다.
*.properties 파일의 종류
| *.properties 파일 | 설명 |
| 파일이름.properties | 기본 메시지 |
| 파일이름_ko.properties | 한글 메시지 |
| 파일이름_en.properties | 영어 메시지 |
리소스번들 작성 예
(message_ko.properties 파일)
name = 강아지
(message_en.properties 파일)
name = puppy
로케일이 ko이면 _ko.properties 파일을 읽어오고 로케일이 맞지 않으면 .properties 파일을 읽어온다.
2)bundle 태그
사용할 리소스번들을 설정하는 태그. .properties 파일을 읽어오는 역할
<fmt:bundle basename="리소스번들파일" [prefix="key 이름"]>
	//내용
</fmt:bundle>
3)message 태그
bundle 태그에 설정한 리소스번들에서 메시지를 읽어와 출력
<fmt:message
	key="메시지 key 이름"
    [bundle="setBundle 태그 변수 이름"]
    [var="메시지 저장 변수 이름"]
    [scope="{page|request|session|application}"]
/>
<%@ page language="java" contentType="text/html; charset=UTF-8"
    pageEncoding="UTF-8"%>
<%@ taglib prefix="fmt" uri="http://java.sun.com/jsp/jstl/fmt" %>
<!DOCTYPE html>
<html>
<head>
<meta charset="UTF-8">
<title>Insert title here</title>
</head>
<body>
	<p>―――――――기본 로케일―――――――
		<p><%=response.getLocale() %>
		<fmt:setBundle basename="bundle.myBundle" var="resourceBundle"/>
	<p>제목: <fmt:message key="title" bundle="${resourceBundle}"/>
	<p><fmt:message key="username" var="userMsg" bundle="${resourceBundle}"/>
		이름: ${userMsg}

	<p>―――――――영문 로케일―――――――
		<fmt:setLocale value="en"/>
		<fmt:setBundle basename="bundle.myBundle" var="resourceBundle"/>
	<p>제목: <fmt:message key="title" bundle="${resourceBundle}"/>
	<p>이름: <fmt:message key="username" bundle="${resourceBundle}"/>

</body>
</html>
(myBundle.properties)
title = \uC790\uBC14 \uC11C\uBC84 \uD398\uC774\uC9C0
username = \uAD00\uB9AC\uC790
password = 1234
(muBundle_en.properties)
title = Java Server Pages
\username = admin
password = 1234
<fmt:setBundle>에서 property 파일을 명시할 때 _ko/_en 등은 인코딩 속성으로, 파일명에 적지 않아도 된다.
3. 숫자 태그
<%@ page language="java" contentType="text/html; charset=UTF-8"
    pageEncoding="UTF-8"%>
<%@ taglib prefix="fmt" uri="http://java.sun.com/jsp/jstl/fmt" %>
<!DOCTYPE html>
<html>
<head>
<meta charset="UTF-8">
<title>Internationalization</title>
</head>
<body>
	<p>숫자: <fmt:formatNumber value="3200100"/>
	<p><fmt:formatNumber value="3200100" type="number" groupingUsed="false"/>
	<p><fmt:formatNumber value="3200100" type="currency" groupingUsed="true"/>
	<p><fmt:formatNumber value="3200100" type="currency" currencySymbol="&"/>
	<p><fmt:formatNumber value="0.45" type="percent"/>
	<p><fmt:formatNumber value="3200100" minIntegerDigits="10" minFractionDigits="2"/>
	<p><fmt:formatNumber value="3200100.45" pattern=".000"/>
	<p><fmt:formatNumber value="3200100.456" pattern="#,#00.0#"/>
</body>
</html>
4. 날짜 태그
<%@ page language="java" contentType="text/html; charset=UTF-8"
    pageEncoding="UTF-8"%>
<%@ taglib prefix="fmt" uri="http://java.sun.com/jsp/jstl/fmt" %>
<!DOCTYPE html>
<html>
<head>
<meta charset="UTF-8">
<title>Internationalization</title>
</head>
<body>
	<p><jsp:useBean id="now" class="java.util.Date"/>
	<p><fmt:formatDate value="${now}" type="date"/>
	<p><fmt:formatDate value="${now}" type="time"/>
	<p><fmt:formatDate value="${now}" type="both"/>
	<p><fmt:formatDate value="${now}" type="both" dateStyle="default" timeStyle="default"/>
	<p><fmt:formatDate value="${now}" type="both" dateStyle="short" timeStyle="short"/>
	<p><fmt:formatDate value="${now}" type="both" dateStyle="medium" timeStyle="medium"/>
	<p><fmt:formatDate value="${now}" type="both" dateStyle="long" timeStyle="long"/>
	<p><fmt:formatDate value="${now}" type="both" dateStyle="full" timeStyle="full"/>
	<p><fmt:formatDate value="${now}" type="both" pattern="yyyy년 MM월 dd일 HH시 mm분 ss초 E요일"/>
</body>
</html>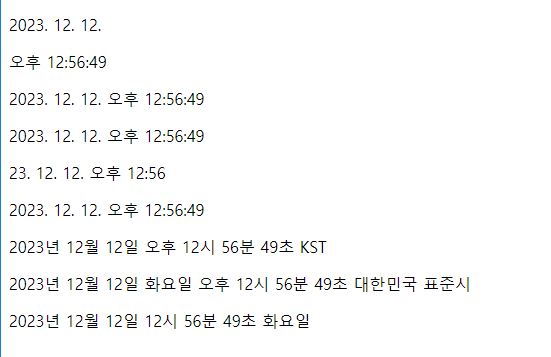
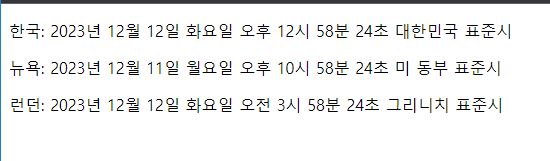
5. 시간 태그
<%@ page language="java" contentType="text/html; charset=UTF-8"
    pageEncoding="UTF-8"%>
<%@ taglib prefix="fmt" uri="http://java.sun.com/jsp/jstl/fmt" %>
<!DOCTYPE html>
<html>
<head>
<meta charset="UTF-8">
<title>Internationalization</title>
</head>
<body>
	<jsp:useBean id="now" class="java.util.Date"/>
	<p>한국: <fmt:formatDate value="${now}" type="both" dateStyle="full" timeStyle="full"/>
	<p><fmt:timeZone value="America/New_York">
		뉴욕: <fmt:formatDate value="${now}" type="both" dateStyle="full" timeStyle="full"/>
		</fmt:timeZone>
	<p><fmt:timeZone value="Europe/London">
		런던: <fmt:formatDate value="${now}" type="both" dateStyle="full" timeStyle="full"/>
		</fmt:timeZone>
</body>
</html>
10. 시큐리티
1. 시큐리티 개요
2. 선언적 시큐리티 처리
3. 프로그래밍적 시큐리티 처리
1. 시큐리티 개요
what?
웹페이지 접근 제한 보안 기능
①JSP 컨테이너가 사용자에게 인증(authentication) 요청(이름/암호)
②승인시 권한 부여(authorization)
1.1 웹 서버에 역할과 사용자 구성
인증 정보 저장: 서버 안의 tomcat-users.xml
주석 부분을 해제해야 기존 설정 사용, 신규 추가 가능
<?xml version="1.0" encoding="UTF-8"?>
<!--
  Licensed to the Apache Software Foundation (ASF) under one or more
  contributor license agreements.  See the NOTICE file distributed with
  this work for additional information regarding copyright ownership.
  The ASF licenses this file to You under the Apache License, Version 2.0
  (the "License"); you may not use this file except in compliance with
  the License.  You may obtain a copy of the License at

      http://www.apache.org/licenses/LICENSE-2.0

  Unless required by applicable law or agreed to in writing, software
  distributed under the License is distributed on an "AS IS" BASIS,
  WITHOUT WARRANTIES OR CONDITIONS OF ANY KIND, either express or implied.
  See the License for the specific language governing permissions and
  limitations under the License.
--><tomcat-users>
<!--
  By default, no user is included in the "manager-gui" role required
  to operate the "/manager/html" web application.  If you wish to use this app,
  you must define such a user - the username and password are arbitrary.

  Built-in Tomcat manager roles:
    - manager-gui    - allows access to the HTML GUI and the status pages
    - manager-script - allows access to the HTTP API and the status pages
    - manager-jmx    - allows access to the JMX proxy and the status pages
    - manager-status - allows access to the status pages only

  The users below are wrapped in a comment and are therefore ignored. If you
  wish to configure one or more of these users for use with the manager web
  application, do not forget to remove the <!.. ..> that surrounds them. You
  will also need to set the passwords to something appropriate.
-->
<!--
  <user username="admin" password="<must-be-changed>" roles="manager-gui"/>
  <user username="robot" password="<must-be-changed>" roles="manager-script"/>
-->
<!--
  The sample user and role entries below are intended for use with the
  examples web application. They are wrapped in a comment and thus are ignored
  when reading this file. If you wish to configure these users for use with the
  examples web application, do not forget to remove the <!.. ..> that surrounds
  them. You will also need to set the passwords to something appropriate.
-->

  <role rolename="tomcat"/>
  <role rolename="role1"/>
  <user username="tomcat" password="1234" roles="tomcat"/>
  <user username="both" password="1234" roles="tomcat,role1"/>
  <user username="role1" password="1234" roles="role1"/>

</tomcat-users>
2. 선언적 시큐리티 처리
서버에서 처리
<?xml version="1.0" encoding="UTF-8"?>
<web-app xmlns:xsi="http://www.w3.org/2001/XMLSchema-instance" xmlns="http://xmlns.jcp.org/xml/ns/javaee" xsi:schemaLocation="http://xmlns.jcp.org/xml/ns/javaee http://xmlns.jcp.org/xml/ns/javaee/web-app_4_0.xsd" version="4.0">
  <display-name>JSPBook</display-name>
  <security-role>
  	<role-name>manager</role-name><!-- 서버의 tomcat-users.xml과 연결 -->
  </security-role>
  <security-constraint>
  	<web-resource-collection>
  		<web-resource-name>JSPBook</web-resource-name>
  		<url-pattern>/ch10/security01.jsp</url-pattern>
  		<http-method>GET</http-method>
  	</web-resource-collection>
 	<auth-constraint>
 		<description></description>
 		<role-name>manager</role-name><!-- 위의 role-name과 연결 -->
 	</auth-constraint>
  </security-constraint>
  <login-config>
  	<auth-method>FORM</auth-method>
  	<form-login-config>
  		<form-login-page>/ch10/login.jsp</form-login-page>
  		<form-error-page>/ch10/login_failed.jsp</form-error-page>
  	</form-login-config>
  </login-config>
</web-app>
2.1 시큐리티 역할 설정<security-role>
★web.xml 파일에서 설정
서버의 tomcat-users.xml에 있는 역할 이름 지정
<security-role>
	<role-name>역할 이름</role-name>
</security-role>
2.2 시큐리티 제약 사항 설정하기<security-constraint>
URL 접근 권한 정의
<security-constraint>
	<web-resource-collection> ... </web-resource-collection>
    <auth-constraint> ... </auth-constraint>
    <user-data-constraint> ... </user-data-constraint>
</security-constraint>
1) <security-constraint> 구성 하위요소
| 요소 | 설명 |
| <web-resource-collection> | 웹 자원 접근 설정 |
| <auth-constraint> | 웹 자원 접근 가능한 사용자 설정 |
| <user-data-constraint> | 데이터 전송시 데이터 보호 설정 |
1-1) <seb-resource-collection> 하위 요소
| 요소 | 설명 |
| <web-resource-name> | 웹 자원 이름 설정(생략 가능) |
| <url-pattern> | 접근 제한 URL 목록 설정(생략 가능) |
| <http-method> 또는 <http-method-ommision> | http 메소드 설정(GET/POST) |
<web-resource-collection> 요소 사용 예시
<security-constrain>
	<web-resource-collection>
    	<web-resource-name>WebMarket</web-resource-name>
        <url-pattern>cart/*</url-pattern>
    </web-resource-collection>
</security-constrain>
2) <auth-constraint> 요소
권한이 부여된 사용자만이 웹 자원에 접근할 수 있도록 이름을 설정하는 요소
<auth-constraint>
	<description>설명</description>
    <role-name>역할 이름</role-name>
</auth-constraint>
2-1) <auth-constraint> 구성 하위 요소
| 요소 | 설명 |
| <description> | 권한 부여 제약 사항 설명 |
| <role-name> | 권한 부여 사용자 이름 설정 *: 모든 사용자에게 권한 부여 |
3) <user-data-constraint> 요소
<user-data-constraint>
	<transport-guarantee>NONE/INTEGRAL/CONFIDENTIAL</transport-guarantee>
</user-data-constraint>
3-1) <transport-guarantee> 종류
| 종류 | 설명 |
| NONE | 데이터 보호 x(기본값) |
| INTEGRAL | 데이터 변경되지 않음 보장(데이터 무결성) |
| CONFIDENTIAL | 데이터를 아무도 훔쳐보지 않았음 보장(기밀성) |
2.3 시큐리티 인증 설정
로그인 페이지/오류 페이지 호출
<login-config>
	<auth-method>...<auth-method>
    <realm-name>...<realm-name>
    <form-login-config>...<form-login-config>
</login-config>
1)<login-config> 구성 하위 요소
| 요소 | 설명 |
| <auth-method> | 웹 자원 인증 처리 방식 설정 |
| <realm-name> | 접근 가능 사용자 설정 |
| <form-login-config> | 데이터 전송시 보호 설정 |
1-1)<auth-method> 요소
BASIC, DIGST, FORM, CLIENT-CERT(인증서)
FORM 기반 인증 시 로그인 페이지 예
<form action = "j_security_check" method="post">
	아이디: <input type="text" name="j_username">
    비밀번호: <input type="password" name="j_password">
    <input type="submit" value="로그인">
</form>
1-2)<realm-name> 요소
기본 인증의 영역 이름 설정
1-3)<form-login-config> 요소
인증 처리를 위한 로그인/오류 페이지 설정 요소
<form-login-config> 구성 하위요소
| 요소 | 설명 |
| <form-login-page> | 인증을 위한 로그인 페이지 설정 |
| <form-error-page> | 인증 실패시 표시할 오류 페이지(선택사항) |
<login-config> 요소 사용 예
<login-config>
	<auth-method>FORM</auth-method>
    <form-login-config>
    	<form-login-page>/login.jsp</form-login-page>
        <form-error-page>/error.jsp</form-error-page>
    </form-login-config>
</login-config>
'정리노트' 카테고리의 다른 글
| [JSP] 필터 (0) | 2023.12.14 |
|---|---|
| [JSP] 시큐리티, 예외 처리, 필터 (0) | 2023.12.13 |
| [JSP] 유효성 검사, 다국어 처리 (0) | 2023.12.11 |
| [JSP] 마인드맵 정리 (0) | 2023.12.08 |
| [JSP] 파일 업로드 (0) | 2023.12.07 |